
In a previous article, we reviewed how AutoLISP can automate repetitive CAD tasks. Specifically, we used the Visual LISP (VLISP) Editor to build a simple application that draws a series of lines.
Because Autodesk is reportedly phasing out the VLISP Editor, AutoLISP programmers would be wise to learn the newest platform for developing AutoLISP applications — the AutoLISP Extension for Visual Studio (VS) Code. Introduced in AutoCAD 2021, this tool allows you to edit and debug AutoLISP files with VS Code, a free code editor from Microsoft.
In this article, we’ll explore how to use the AutoLISP Extension for VS Code to automate some CAD tasks, building on the previous example to make it more flexible. To provide additional user interaction, we’ll also use the DCL (dialog control language) to create a dialog box for use with an AutoLISP program.
Installing the AutoLISP Extension for VS Code
If you haven’t yet installed the AutoLISP extension and VS Code, you’ll need to install both applications. Autodesk’s Developer’s Guide provides detailed instructions on how to do this. A couple of tips:
-
Make note of where VS Code is installed on your computer, as you will need it later if you want to start VS Code as a standalone app. The path should look something like this:
C:\Users\your user name\AppData\Roaming\Microsoft\Windows\Start Menu\Programs\Visual Studio Code
-
You may have to show hidden files on your computer to see this and other folders referenced in this article. For Windows users, you can find instructions for this here: View hidden files and folders in Windows.
Building an AutoLISP Routine with the Extension
After installing the AutoLISP and VS Code, you can build your first application. You can start VS Code in standalone mode or from within AutoCAD. We’ll use the latter method for this example.
1. From the Manage tab in AutoCAD, click Visual LISP Editor.

Click image to enlarge.
If you’ve been using the VLISP Editor, you may have to change the LISPSYS system variable to open the VS Code editor. If LISPSYS is set to 0, the legacy AutoLISP engine and VLISP IDE are used for editing and debugging AutoLISP files. If LISPSYS is set to 1 or 2, the AutoCAD AutoLISP Extension will be used. See the previous article if you need a refresher on how to do this.
When you open VS Code, you should see a window like this:
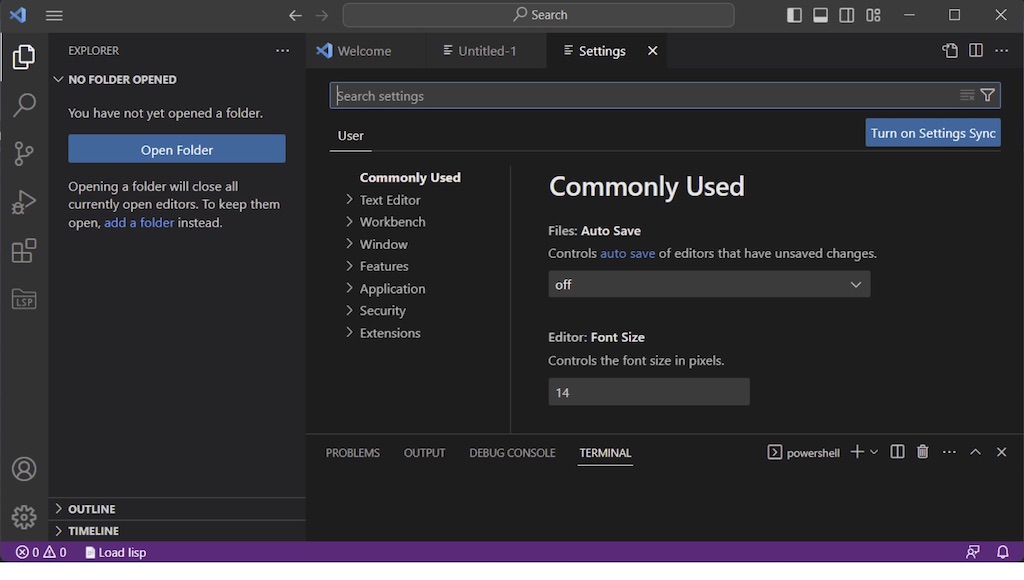
Click image to enlarge.
2. In VS Code, click the three bars in the upper left corner to open the main menu, then click File > New File to create a new file.

3. In the text box, give the new file a name, such as DCLDraw.LSP.
4. In the code window, enter the following code.
(Hint: You can copy/paste this code to avoid typing!)
(defun c:DCLDraw (/ n dcl_id what_next x1 y1 x2 y2 pt1 pt2 i)
(setq dcl_id (load_dialog "slider.dcl")
what_next 2
)
(while (<= 2 what_next)
(if (not (new_dialog "slide" dcl_id))
(exit)
)
(action_tile
"slider_info"
(strcat
"(if (or (= $reason 1) (= $reason 3))"
"(progn (set_tile \"nb\" $value)"
"(setq n (atoi $value))))"
)
)
(action_tile
"nb"
(strcat
"(if (or (= $reason 1) (= $reason 2))"
"(progn (set_tile \"slider_info\" $value)"
"(setq n (atoi $value))))"
)
)
(action_tile
"accept"
(strcat
"(progn"
"(setq n (atoi (get_tile \"nb\")))"
"(done_dialog 1))"
)
)
(setq what_next (start_dialog))
)
(unload_dialog dcl_id)
If you’re new to AutoLISP, this may look like gibberish. Don’t worry about that now. In brief, this code defines a function called “DCLDraw” using the AutoLISP defun function in the first line. The function name is prefaced by “c:” to indicate this will be a built-in function that can be run directly from the AutoCAD command line. In the same line, we also listed some variable names preceded by a forward slash (/). The rest of this code essentially calls a dialog box that we’ll build shortly, and it captures the value selected from that dialog box, saving it with the variable name n.
5. At the end of the code just entered, continue entering code.
(setq x1 0.0
y1 0.0
x2 5.0
y2 5.0
)
(setq pt1 (list x1 y1)
pt2 (list x2 y2)
)
(setq i 1)
(while (<= i n)
(setq y2 (+ y2 5))
(setq pt2 (list x2 y2))
; check to see that the two points exist
(if (and pt1 pt2)
(command "_.line" pt1 pt2 "")
(princ "\nError in point data.")
)
(command "_.chprop" (entlast) "" "C" i "")
(setq i (+ 1 i))
)
(princ "Number of lines drawn: ")
(princ (- i 1))
(princ)
)
If you worked through the example in the previous article, this code should look familiar. It is essentially the same code used in that example to draw a series of lines, with one key difference. It allows the user to select the number of lines to be drawn, using the variable n established in the dialog box code.
6. Click File > Save to save your changes to the .LSP file.
Building a Dialog Box with DCL
The preceding steps developed a .LSP file in the VS Code environment. We now need to build a dialog box to allow the user to select the number of lines to draw. We’ll do this from the VS Code environment, and incorporate a slider dialog box, one of several options available in DCL. More information on DCL and dialog boxes can be found in the Developer’s Guide and Reference Guide.
1. In VS Code, click File > New File to create a new file.

2. This time, before naming the file, click Built-In just below the file name text box. Then click Select a Language and select AutoLISPDCL.
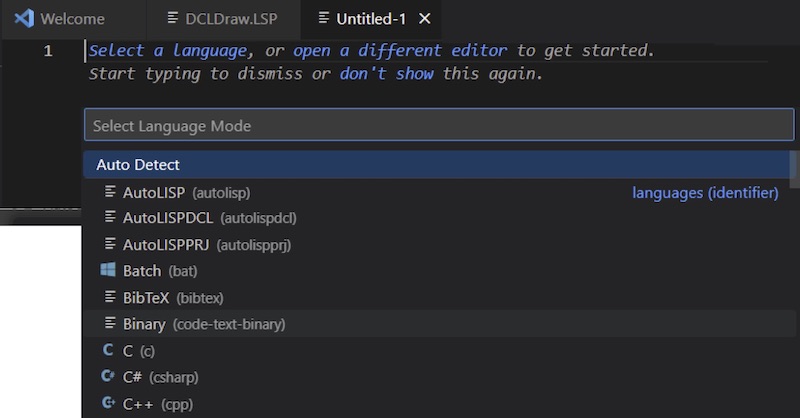
Click image to enlarge.
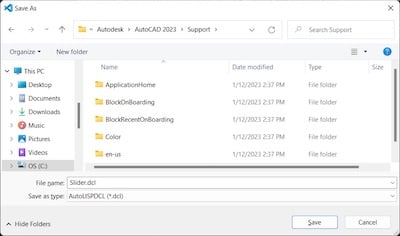
3. Click File > Save As. Navigate to the location where you want to store the DCL file and save the new file with a name such as Slider.DCL.
Note: Make sure the DCL file is saved in one of the folders in the AutoCAD Support File Search Path, such as the following.
4. In the new file, enter the following code.
slide:dialog{
label="Number of Lines";
:boxed_row{
label="Choose a number";
:edit_box{
label="Number:";
key="slider_info";
value="5";
edit_width=4;
allow_accept=true;
}
:slider{
key="nb";
value="5";
max_value=10;
big_increment=1;
small_increment=1;
width=20;
}
}
ok_cancel;
}
5. Click File > Save to save the .DCL file.
Again, this code might not make much sense if you’re new to DCL. In general, it creates a dialog box with a slider control similar to what you might see in many Windows applications. It uses code to establish the size and format of the various components of the dialog box.
Try It Out
We’re now ready to try out the AutoLISP application. With AutoCAD running, try the following steps.
1. In VS Code, click Run > Run without Debugging.

2. When prompted to pick the process to attach, select AutoCAD and the active drawing.
3. In AutoCAD, from the Manage tab, click Load Application and load the .LSP file.
4. At the AutoCAD command line, type DCLDraw. You should see the dialog box built with DCL code.
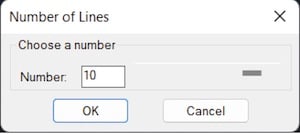
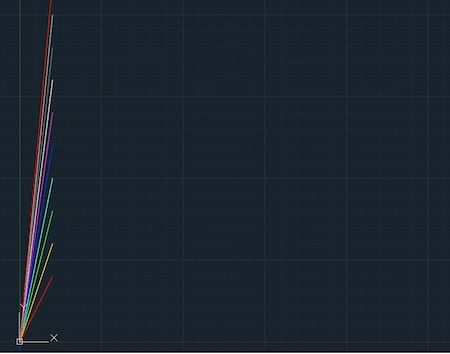
5. Click and drag the slider bar to display the number of lines to draw and click OK. You should see a series of lines drawn based on the number you selected.
Was It Worth It?
If you’re thinking, “This seems like a bunch of work to accomplish a fairly simple task,” you’re not alone. AutoLISP remains a rather cryptic language that requires more coding than other graphically oriented tools, but this example shows what’s possible with AutoLISP and DCL. It’s an approach some longtime AutoLISP programmers have used successfully for years.
The example also showed how to use the AutoLISP Extension for VS Code, which appears to be the platform of the future for AutoLISP. While some may still prefer the VLISP Editor, VS Code has its merits; try some of the other features, such as debugging with breakpoints and executing AutoLISP statements in the Debug Console. These tools may particularly appeal to .NET programmers. The extension also offers Intellisense for completing partially typed statements.
For more details about AutoLISP code, refer to the previously mentioned AutoLISP documentation.
You can also develop AutoLISP routines to work in conjunction with applications developed in other environments, such as Python or .NET. We saw an example of this in a previous article on Python.
We’ll explore other programming tools in future articles. If you have specific ideas for programming topics, feel free to drop us an email.


Share This Post