
In previous articles, we’ve looked at various programming and customization options for CAD products. In this article, we’re going to explore a relative newcomer to the CAD programming scene — Dynamo.
Introducing Dynamo
Currently available as an add-in for several Autodesk products, Dynamo offers a visual programming interface that allows you to automate repetitive tasks with minimal coding. Rather than typing code, you drag and drop components in a graphic environment and process your routines in the same environment.
The examples in this article will be based on a Civil 3D environment, but most concepts also apply to Revit and other products. In 2015, Autodesk introduced a companion product, Dynamo Studio, to aid developers, but recently announced plans to discontinue it, as Dynamo capabilities have been extended into Civil 3D, Revit, and other products.
For more experienced programmers, Dynamo can also run as a standalone product, with its own execution engine, and can access other products via connectors. The core Dynamo technology is available as a free download via the Dynamo Sandbox.
Installing and Starting Dynamo
If you’re new to Dynamo, the first step is to make sure it’s installed in your CAD environment. For Civil 3D 2021 and later versions, it is included in the main product installer as an optional subcomponent. For Civil 3D 2020, you need to do a separate download and install from your Autodesk account. Once installed, Dynamo icons show up on the Manage tab.
![]()
When you click the Dynamo icon, you’ll see an initial screen with options to create a new Dynamo file, open recent files, and perform various other tasks.
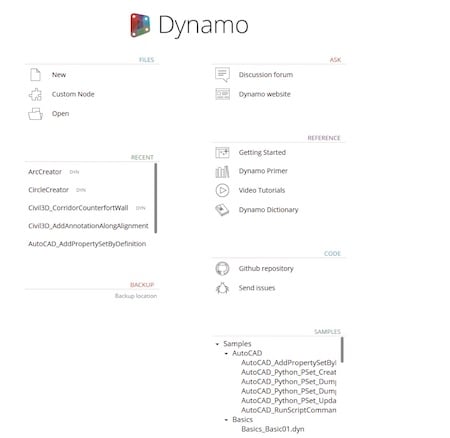
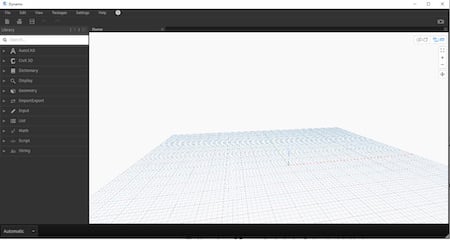
Click New to create a new file. You’ll then see the main Dynamo interface, with menu choices across the top, a Library pane along the left, and a grid occupying the majority of the window.
Create Something in Dynamo
To see how Dynamo works, let’s look at a simple example — how to draw a line using Dynamo.
1. In the Library pane, you’ll see a series of categories. Click and expand the Geometry category to display additional choices.
2. Click and expand the Curves and Line categories in a similar manner. You’ll see a series of nodes, which are the primary building blocks in Dynamo. They represent the objects and commands you’ll be using to build a Dynamo routine, or script. (In the Dynamo geometry tree, a line is considered a type of curve.)
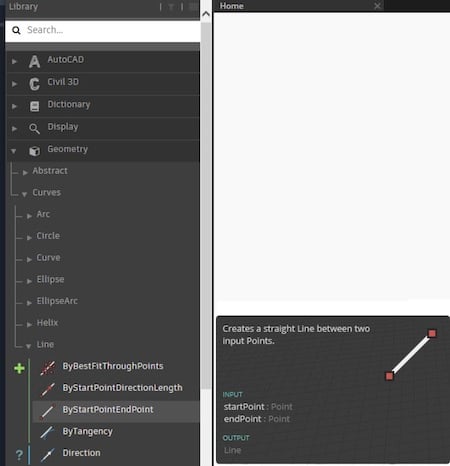
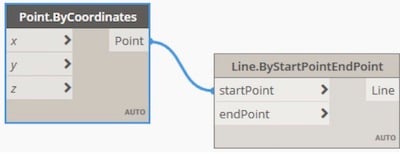
3. Hover your cursor over some nodes to see a description of each node, then click ByStartPointendPoint to select it. This places a node in the workspace.
4. Hover over the various items in the node box, and you’ll see what type of input is required. For example, the start point will require a point as input. On the right side of the box is the output of the node — in this case, a line.
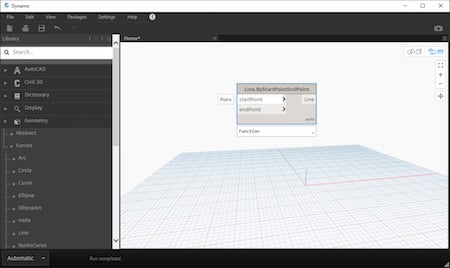
5. To find various ways of entering point data, type “point” in the Search box.
6. From the list of choices for entering point data, select ByCoordinates. This places another node in the workspace.
7. Drag the Point.ByCoordinates node to the left of your line node. Dynamo workflows are generally best arranged to progress from left to right.
8. Click on the Point box inside the Point.ByCoordinates node and connect it to the startPoint box in the line node. You’ve now created a wire connecting two nodes. The output of the left box provides the input to the next box.
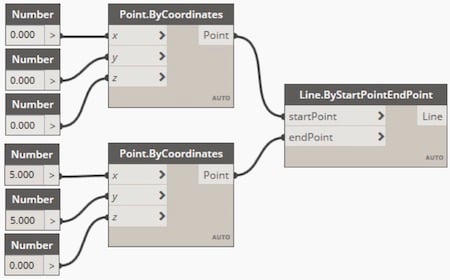
9. Create an additional Point.ByCoordinates node for the end point and connect it to the endpoint box in the line node.
10. Create additional nodes and connect them with wires to provide the necessary input for the start and end points of the line. Use a basic number node for entering points, and change some of the values so the start point and end point are different. When you’re done, your workspace should look something like this:
11. Right-click on your input nodes and rename them to more logical names. (This step is optional.)
12. Type various numbers in the input nodes and notice how the line changes in the grid as you change the input values.

13. From the File menu, click Save to save your Dynamo script with a name of your choice.
Bring an Object Into Your Drawing
We’ve drawn a line, but it’s not yet part of an AutoCAD drawing. To do that, we need to add some more nodes to our workflow.
1. In the lower-left corner of the Dynamo window, click the Automatic dropdown and change the run mode to Manual. This allows you to determine when to run the script.
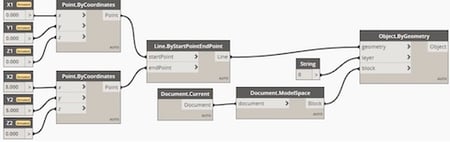
2. In the Search box of the Library pane, type “object.by” to find ways to create objects. Click Object.ByGeometry to add this node to your workspace and move it to the right of the other nodes.
3. Connect the line node to the geometry box of the Object.ByGeometry node, using the same techniques you used previously.
4. Add nodes to identify the current document and model space using the Document.Current and Document.ModelSpace nodes.
5. Add a String node to identify the layer and type “0” to place the line on layer 0. (You can change this to another layer of your choice.) The string node is used for entering text instead of numbers.
6. Connect the nodes as shown below.
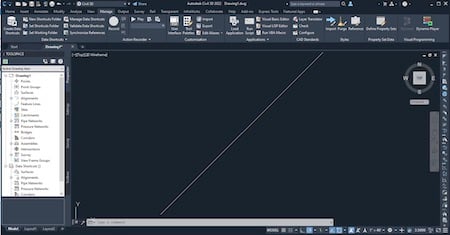
7. Click Run in the lower-left corner of the Dynamo window to run your script.
8. Minimize the Dynamo window to display the AutoCAD drawing. You should see a line drawn in model space.
Now What?
You may be thinking: “So what? I just created a line, which I could have done much faster in AutoCAD or Civil 3D.” This example was just intended to show how to do a simple task in Dynamo; the real power of Dynamo is harnessed when you automate tedious or repetitive tasks and reuse scripts multiple times, potentially saving significant time.
Once you know how to create and connect nodes, you can expand your repertoire to create more complex objects, as well as modify objects already in a drawing. You can also extract information from a drawing and export it to spreadsheets or other locations, enabling you to create reports and share data with colleagues.
For running previously saved Dynamo scripts, check out the Dynamo Player, which is accessed via the icon right next to the Dynamo icon you clicked to launch Dynamo. The player lets you load and run scripts, plus share your scripts with others.
Also, check out the references listed in the initial screen you saw when you first launched Dynamo. Autodesk provides a helpful Getting Started document, along with other references and sample scripts. Forums such as the one found at dynamobim.com can be particularly helpful. Because Dynamo is an open-source platform and is constantly under development, you may encounter situations where a technique works fine in the current version of your CAD product, but not in an older version, or vice versa. You may even encounter bugs or quirky behavior. The forums are often visited by helpful people who have encountered similar situations and can help resolve your issue.
In a future article, we’ll explore some more complex tasks that can be accomplished using Dynamo. If you have specific ideas, feel free to drop me an email.


Share This Post