
Editor’s Note: Welcome to Cadalyst's blog series by Patrick Hughes, A CAD Dinosaur's Journey into Modern Times.” In this three-month series, Hughes chronicles his transition from AutoCAD R14 to v2015 and from an outdated PC to a state-of-the-art professional workstation. Follow along and enjoy!
 When your teeth are as large and old as this T-Rex’s, any reference to the word “extraction” can send chills up and down one’s spine. But as I investigate the AutoCAD Dataextraction command introduced in AutoCAD 2008 I find some comfort in its connotation. I think I’ll use Dataextraction (DX) a lot and it will impact my design and detail work, although I’m not 100% certain how. That’s the one thing about working with new tools and methodologies — until it becomes more ingrained, there are many directions you can go. In the meantime, I’m trying a number of approaches to make my work less brain intensive and more efficient.
What I can envision at this stage, however, is that it will save me a lot of time when creating BOMs (bills of materials) for my assemblies. The tool is easy enough to use even with a walnut-sized brain such as mine. As you select data, a DXE file is created or you can select a previously created DXE file. From this point, you add or remove drawing files for extraction and then you can select the objects and properties to include in the result. Finally, you can output the data to several file formats (XLS, CSV, MDB, or TXT) or insert into your current drawing as a table.
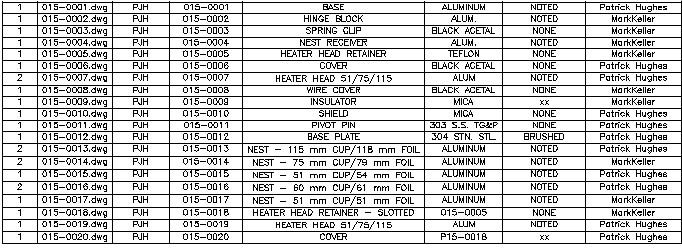
The Dataextraction command makes it easy to populate a BOM.
Everyone Has Standards — Just Not the Same Standards
Long ago when I began doing contract work for multiple clients, I created my own standards based on my workflow and output. It was (and is) my opinion that rather than learning new standards for each client, it is more efficient for me to have my own standards. Then at the end of a project I convert layers, linetypes, colors, etc., to the customer’s standard via an AutoLISP file created for that customer. Along with converting from my standard to a customer’s standard, I also made AutoLISP files to convert their drawings to my standards. Checkstandards (released in AutoCAD 2002) does this from within AutoCAD without AutoLISP. I was a bit confused to begin with, but with a little help from my friend Help I learned that I could establish a drawing standards file simply by opening a conforming drawing and saving it as a DWS file. Then, I open a drawing and apply the standard against the open drawing accepting or declining modifying objects as needed. It looks to be a handy addition.
Also introduced in AutoCAD 2002, Laytrans aids in establishing, maintaining, and converting a drawing from one standard to another. When I use the Viewbase command, AutoCAD creates its own layering scheme placing object lines on its own layer named MD_Visible and hidden lines on another layer named MD_Hidden with the corresponding linetypes and each layer with its own default color of white and lineweights of 0.50 mm and 0.35 mm respectively. Since I’ve been creating drawings using Exportlayout, the layers carry over to the new drawing. My preference (and standard) is such that all linework associated with a component remains on the same layer and the objects are assigned a linetype and color based on its appearance in the drawing. With the Laytrans command I can modify the AutoCAD generated layers and translate them to my desired layer arrangement. Although I haven’t as yet been able to segregate the MD_Visible and MD_Hidden. It will take a little more experimentation to get me to my end goal.
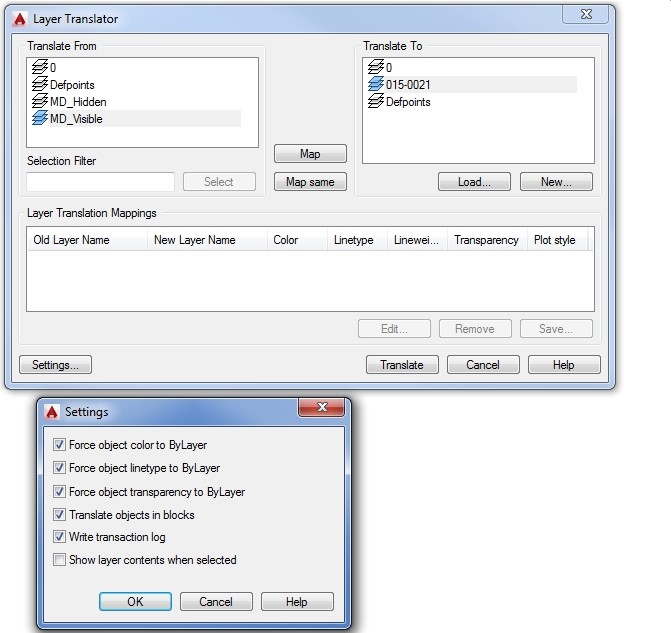
Use Laytrans to translate and arrange layers.
One tool I will use to finalize my process is Qselect, introduced all the way back in AutoCAD 2000. I’ve always been a big user of the Filter command which offers a powerful way to select objects based on numerous user defined properties, but it's time to add Qselect to my repertoire. I like to view Qselect as the Dinosaur Way to chomp down on a tasty morsel of drawing objects rather than the more refined use of dining utensils that the Filter command offers. Dinner is served!
Rawrrr!
It used to be that you had to customize AutoCAD using AutoLISP files, macros, batch scripts, and a host of other methods. While there is still value in using those methods, there are more tools built into AutoCAD that help you to get the work done with less external customization.
_________________
About the author: Patrick Hughes, machine designer and owner of Engineered Design Solutions in Rockford, Illinois, has worked with AutoCAD since 1991. He has developed a number of AutoLISP and other software solutions to automate his workflow and increase productivity, including the commercially available time tracking program, CadTempo.


